

This is part 2 in a series of tutorial blog posts about how to compose a SID tune in SID Factory II. It will be about using order lists and sequences to play notes, transpose them, and create variation. Click here for part 1.
At this point you should have read the tutorial about hexadecimal numbers and have an understanding of what it’s about. Don’t worry if you still haven’t got the hang of it yet.
In the previous part, I also linked to the page where you could download SID Factory II. If you still haven’t done so, click the link in the italic line in the top. Now extract the ZIP file to a folder. Just inside, only one file can be executed. Run it now, then press the space bar to close the initial screen with credits.
You should now be seeing this:
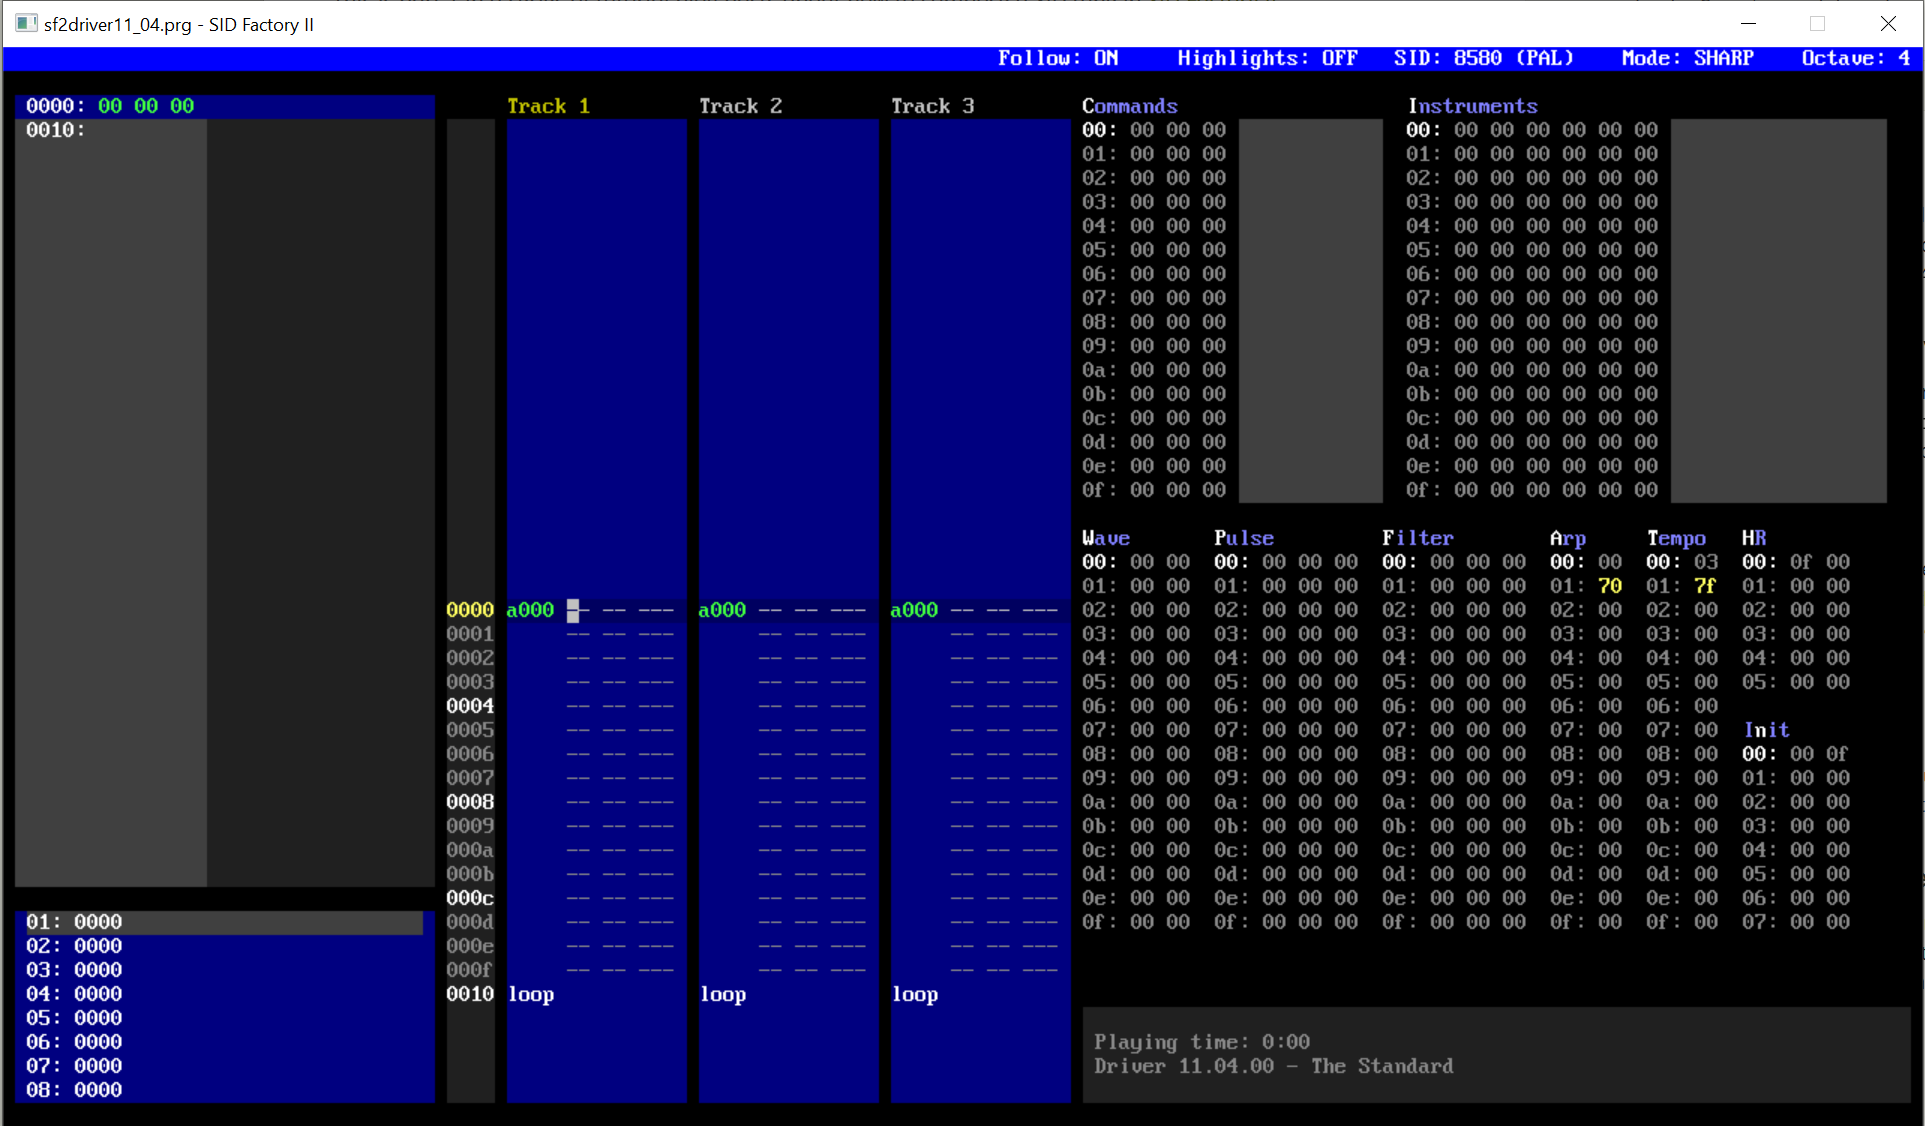
The very first thing I want you to do here is to repeatedly press Ctrl+F7.
Each press of this hotkey combination changes the color scheme and loops back at one point. Keep hitting it until you find a color scheme that you like. It’s possible to make the choice of color scheme sticky, but it requires that you edit a configuration file. I’ll get back to that in a later part.
The very basics
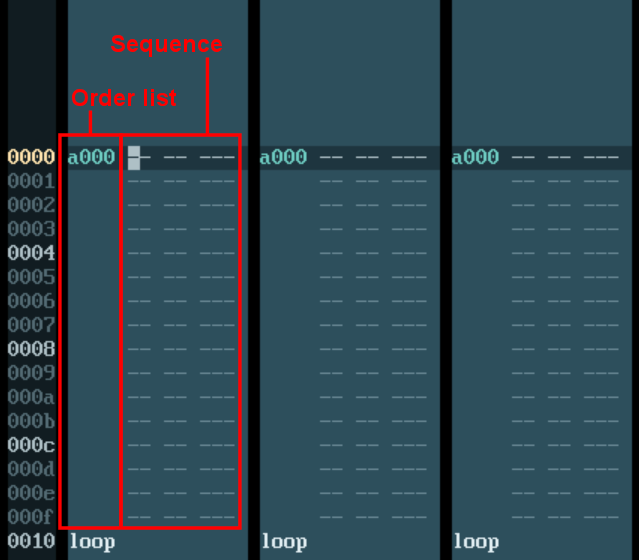
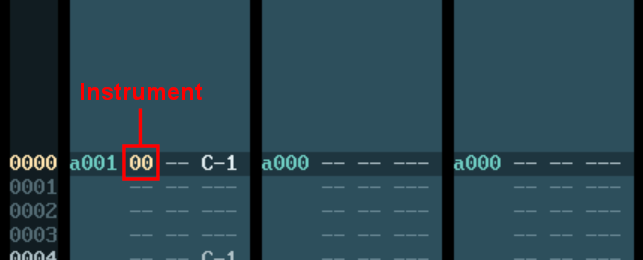
The three vertical panes in the middle are called tracks. As you can see there are three of those, which matches the number of voices in the SID chip. Each track has a hexadecimal word and a cluster of lines. The hexadecimal word a000 is in a column called the order list. It represents a sequence and also how it is transposed. The sequence that a000 represents is that cluster of lines. As you can see, it has a specific number of rows. As soon as these rows reach the end of what has been predetermined for the sequence, either the song ends with loop or the order list word shows another sequence.
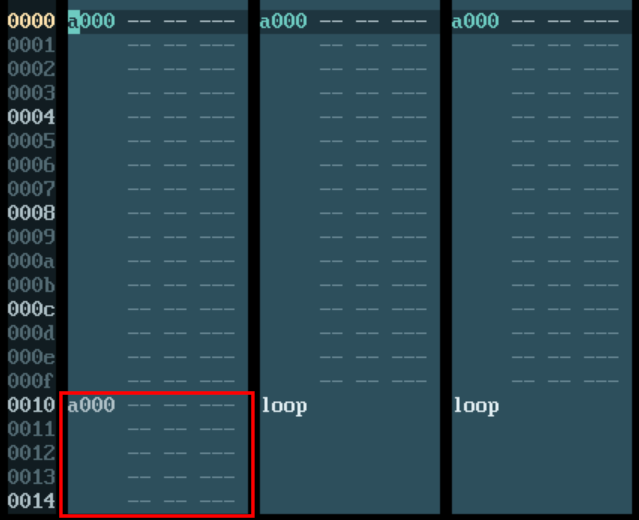
To see what I mean by this, try hitting Enter. This puts the cursor on the order list word a000. In fact, that’s how you toggle back and forth between the order list and the sequence itself. But while you’re in the order list, try hitting the Insert key. You should now see another sequence below it.
The word a000 is actually two bytes with each their meaning. The first byte a0 is the transposition. I will get back to that later. The next byte, 00, that’s the sequence number. It’s like the post address for the sequence. What you’re seeing now in all voices are the contents of sequence 00. This also means that because this is the only sequence currently being shown, editing it would be mirrored in all of them.
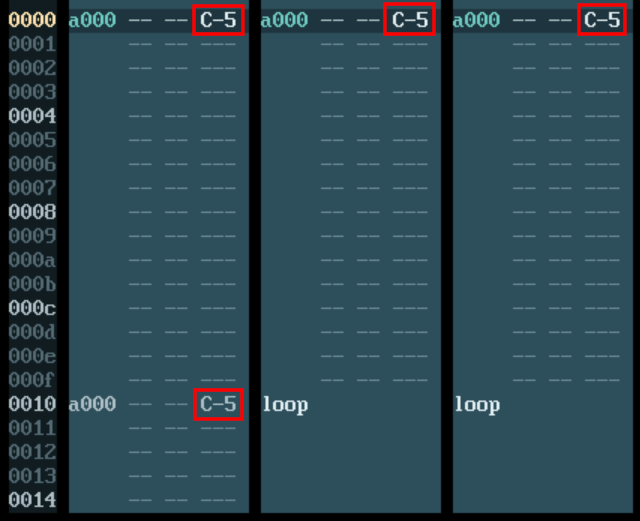
Let’s try that. Press Enter again to return to editing the sequence. Now hit the q key. This types C-5 in the sequence, and because this sequence is shown everywhere, they all show the same updated contents. What does C-5 mean? I will get back to that too.
Almost all modern music players on the C64 put together their cluster of notes in sequences like this, and the order list shows how they’re lined up. You could have one order list entry showing a sequence with one bassline, another entry with the same sequence transposed a few notes down, then another entry with a different sequence where a few of the notes have been changed. Putting sequences together like this not only makes for faster composing, it also saves a lot on precious C64 memory.
SID Factory II can have as many as 128 different sequences, and each sequence can have more than 1000 rows thanks to a clever real-time packing technique. Typically you would only use about 32 or 64 rows for most of your sequences, though. Or, in hexadecimal, 20 or 40 rows.
Delete the C-5 by simply hitting the Delete key while on the same line. Hit Enter again to return to the orderlist. Hit Delete there to remove the a000 straggler below it.
You should now be back to how it all looked at first.
A simple bassline
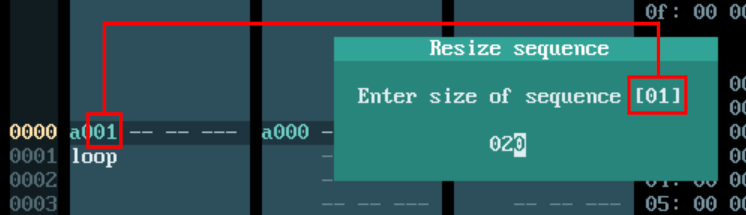
Now let’s try and make a bassline. Edit the word to read a001 then hit Enter. Now the sequence shrunk down to just one line. This is because all new sequences doesn’t have a size defined yet. To set this for the sequence, hit Enter to return to the sequence, then hit F5. You should now see a small dialog box where you can resize the sequence. Type 020 (hexadecimal for 32) and hit Enter. The dialog box closes and sequence 01 should now be twice as big as sequence 00.
It’s time to enter a few notes for the bassline. Most music editors for the C64, including SID Factory II, edits these as letter notation. The piano keys are handled like this:
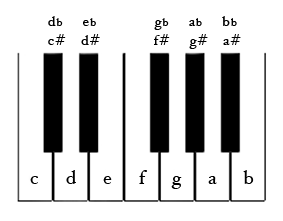
The SID chip supports up to 8 octaves, and this is shown after the letter notation – starting with 0 for the lowest possible octave. This means that a E-0 is a very low E, C#4 a medium C#, and F#7 a very high F#. Notice how a sharp is indicated. White keys have a dash between the letter and the octave number, and black keys have a hash character. You can also show flats instead, if you are composing a tune where it makes better sense to show it like that. To change this, click Mode: SHARP in the top banner. When it reads Mode: FLAT, black keys will be shown as e.g. Eb2, Gb7, etc.

Click the mode field again now to return to sharps.
Instead of typing a “C” then a “#” and then a number, SID Factory II just uses hotkeys arranged all over the keyboard to give access to two contiguous octaves at any time. It makes typing notes much faster. The hotkeys are arranged like this:
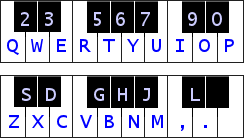
Since only two octaves can be typed, an octave selector can be adjusted to select which octaves you want. See that Octave: 4 field in the top banner? You can change its reading with F3 (down) and F4 (up) keys. You can also left-click it to increase it, and if you’re on Windows or Linux, you can right-click it to decrease it.

When it reads 4, hitting a note hotkey in the lower part of the keyboard types a note with that octave, and in the upper part of the keyboard, it types a note with octave + 1.
Knowing this, we can now type the notes for the bassline. Make sure you’re editing the sequence right now (remember Enter toggles between order list and sequence) and then cursor as far right as you can.
In case you’re curious, there are shortcuts for that too. You may have noticed that returning to the sequence with Enter automatically places the cursor in the column where notes can be typed. You can also jump between the three columns of lines with Ctrl+Left and Ctrl+Right. Or you can be lazy and just click the mouse where you want to edit something. In fact, I often just do that myself.
Since we’re editing a bassline, we want to use a lower octave setting. Hit F3 a few times until it reads 1.
While standing in the last column of lines in the first track, at position 0000, hit the z key. This is the first piano key in the lower part of the keyboard and thus it will type C-1. Now cursor down to position 0004 and hit the same key again. Further down, at position 0008, hit the q key instead. Since this is in the upper part of the keyboard, it should type C-2.
Keep going down in sequence 01, typing more notes, until it looks like this:
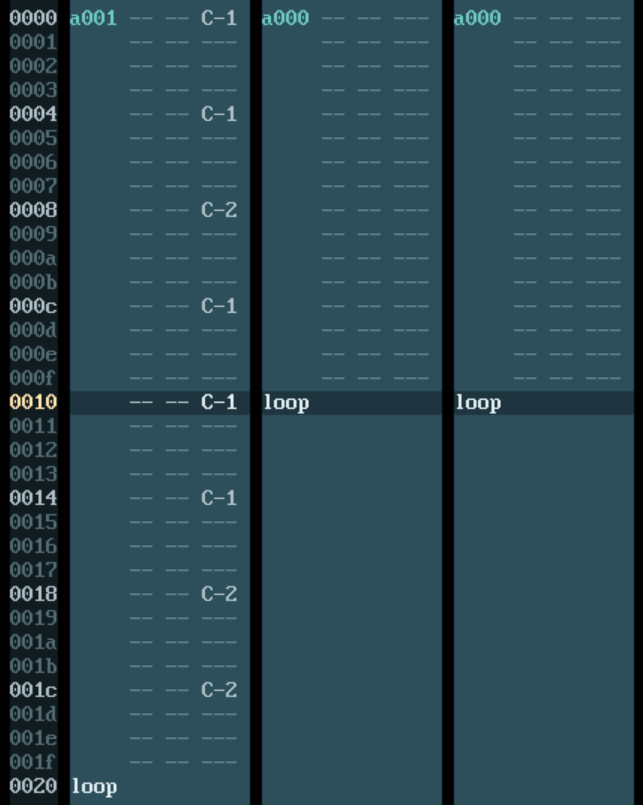
Notice there are two C-2 in the bottom. It’s not the most sophisticated bassline ever and it certainly won’t leave Stevie Wonder jealous, but it will suffice nicely as an example.
In order to play your song, hit F1. While the music is playing, you can toggle between following the song or just staying put. To do this, click the Follow: OFF field in the top banner. Hit F1 again to stop.

But wait, why was it just silent? It’s because you haven’t created an instrument yet.
Creating instruments is a whole subject in and of itself and we’ll come back to it in greater detail in a later part. For now, we’re just going to add the most basic values possible for the bassline.
You can go to the table with instruments in several ways. You can keep hitting the Tab key until the cursor is there, or you can go there by clicking the table with the left mouse button. It’s also possible to get there instantly by hitting Alt+i. In fact, all the tables have a shortcut like that. The highlighted letter in the table header is the letter you can press in conjunction with Alt to get there.
Make sure you’re editing the first line, i.e. at position 00. Edit it so it reads 00 c9 00 00 00 00.
Press Enter to reach the empty space next to the bytes. This is where you can name an instrument. Type Sawtooth or something else fitting here. Hitting Enter returns to editing the instrument again.
It should now look like this:
00: 00 c9 00 00 00 00 Sawtooth
What you just typed in was part of the so-called ADSR. This is a feature built into the SID chip that defines a few volume levels of a voice, and also how long it takes to reach and leave these volume levels. We’ll get back to that in the part about instruments.
ADSR is a fine first step, but we’re not quite done yet. We also need to tell the SID chip what waveform it needs to use. This takes place in the Wave table. You do know how to get there now, right?
You can get to the Wave table in one of three ways:
- You can hit the Tab key once.
- You can hit the Alt+w key combination.
- Or you can just click any of its table bytes to go exactly there.
The Wave table is an important part of setting up an instrument. You won’t get a sound without preparing both. The last byte of the instrument we set up already points to position 00 in this table, so edit this line to read 21 00, then cursor down and make the next line read 7f 00.
It should now look like this:
00: 21 00
01: 7f 00
The value 21 is a sawtooth waveform, one of four basic waveforms built into the SID chip. The value 7f below it is a loop command. It tells the player that it should continue using this wave step for the entire duration of the note. You’ll learn much more about this in a later part.
The instrument is now ready to say something and we only need to tell the sequence about it. The easiest way to return there is to click the first line of the sequence with the left mouse button. Move the cursor as far left as possible on the top line, right next to the order list column. This is the instrument column. Now type 00 there to indicate that you want the notes to use that instrument.
Hit F1 now. This time you should hear the notes play. Hit F1 again to stop.
More sequences
We finally have one good sequence that plays a sawtooth waveform sound for a bassline. Now we’re going to add more sequences, transpose a few of them on the way, and even have a variation.
Go back to the order list with Enter and cursor down to the loop word. Hit Insert once. This should add another a001 below the other one. Notice how the inserted sequence is a001 – and not a000. SID Factory II always inserts the same sequence as the one just right above it.
Edit the a001 word of the second sequence to read a301 instead and press Enter. All of the notes should now read D# instead of C, yet still retain the same octave shifts. You just transposed the entire sequence up three semitones. The default for a new sequence is always a0. It’s possible to transpose a sequence down -32 semitones (to 80) or up +31 semitones (to bf).
![]()
Transposing a sequence can save a lot of C64 memory. Just two more bytes.
Let’s add two more sequences in the order list, each time moving down to the loop word and hitting Insert. Edit the first one to read a701 and the second one a501.
The order list should now have these four sequences in a row:
a001 - plays C notes
a301 - plays D# notes
a701 - plays G notes
a501 - plays F notes
Try playing it with F1. It’s a tad slow, isn’t it? Let’s make it play faster.
In the right side there’s a table named Tempo. It currently reads 03 in position 00. Edit it to read 02 instead and play the song again. Now it’s faster, but perhaps a little bit too fast now. Luckily it’s possible to amend that too. Edit the table to read this instead:
00: 02
01: 03
02: 7f - this tells the player to loop back to the beginning
When you play the song now, it plays at what feels like 2½ speed. That is virtually correct. What the player is actually doing is using the numbers in the table as a countdown for each row it processes:
- Start the song.
- Play the first row of the sequence for 2 ticks.
- Play the second row of the sequence for 3 ticks.
- Play the third row of the sequence for 2 ticks.
- Play the fourth row of the sequence for 3 ticks.
- Etc.
The tempo table allows for all kinds of crazy combinations, including longer lists. Not only does this make it possible to play at intermediate speeds, it also allows for swing tempo.
We now have a enough changes that we want to save. Hit F11 now to open a file list. Once you have named and saved your work, you can save to the same file with Ctrl+s. It’s possible to get rid of the confirmation dialog box by adjusting a setting in a configuration file. I’ll show you how to do that in a later part.
Now I will show you how to make a change to a sequence to make the bassline more interesting. Go back to the order list words of the first track and move down to the fourth and final sequence a501. Now we want to clone this sequence so it can be changed without affecting the first three uses of the original sequence. There are several ways to do this:
- Copy and paste – when you want to have full control:
- Hit Ctrl+c on the
a501to copy its contents to the clipboard. - Type a sequence number you believe is unused, for example
a502, then hit Enter. - Hit Ctrl+v to paste the contents of the clipboard into this new sequence.
- Hit Ctrl+c on the
- Insert the next unused sequence – it may have contents, but it’s no longer used anywhere:
- Hit Ctrl+c on the
a501to copy its contents to the clipboard. - Hit Ctrl+f on the
a501to insert the next sequence that is unused, which isa502. - Since this inserts, you have to cursor down and delete the one below then cursor back up.
- Hit Ctrl+v to paste the contents of the clipboard into this new sequence.
- Hit Ctrl+c on the
- Insert the next empty sequence – it must be the next completely empty sequence:
- Hit Ctrl+c on the
a501to copy its contents to the clipboard. - Hit Ctrl+Shift+f on the
a501to insert the next sequence that is empty, which isa502. - Since this inserts, you have to cursor down and delete the one below then cursor back up.
- Hit Ctrl+v to paste the contents of the clipboard into this new sequence.
- Hit Ctrl+c on the
- Duplicate and replace sequence – by far the most awesome way to do it:
- Hit Ctrl+d on the
a501to clone its contents to the next unused sequence, which isa502.
- Hit Ctrl+d on the
You may be thinking, Ctrl+d is so much easier, why bother having the other methods at all? It’s because of history, actually. The duplicating method didn’t exist in the beginning and we had to use one of the other methods instead. However, copying and pasting can still be useful in other situations.
If you make a mistake and accidentally screw things up, don’t worry. SID Factory II has full undo and redo everywhere. Just hit Ctrl+z to undo, or Ctrl+y to redo what you just undid. Even in tables.
So I recommend you just hit Ctrl+d now to clone a501 to a502, unless you already did this. Now hit Enter to edit the sequence. Use the F3 and F4 hotkey to set your octave to 1, then use the note hotkeys in the upper part of the keyboard to edit the last four notes to read F-2, D#2, D-2 and C-2 instead.
The sequence should now look like this:
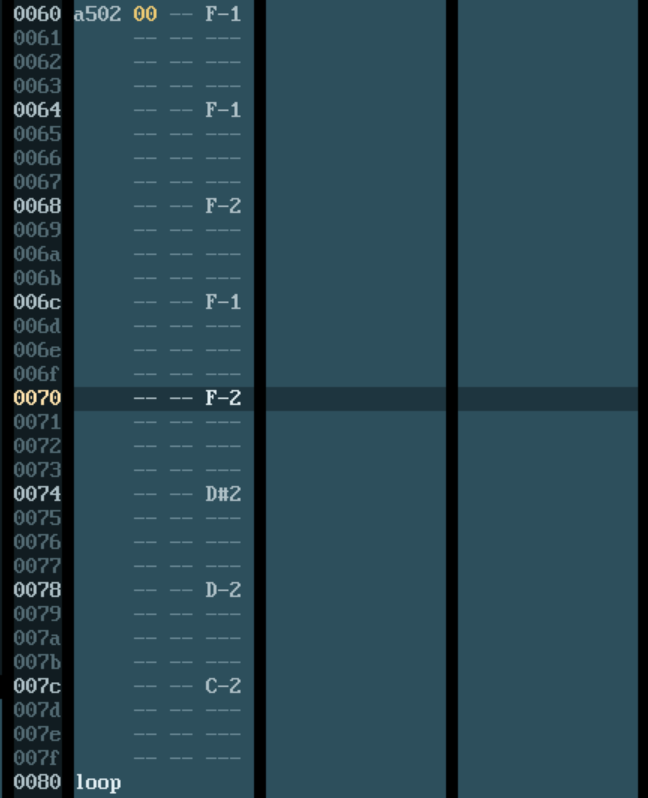
Now when you play the song again, the fourth and final sequence should be different and then it loops.
 Part 3: How to use all three tracks for making a song.