

This is part 3 in a series of tutorial blog posts about how to compose a SID tune in SID Factory II. It will be about using the tracks to create a song that uses all three voices of the SID chip. Click here for part 1.
In the previous part we created a bassline in one track. If you saved that and would like to load it now, start SID Factory II and then press F10 to show a file selector screen. Find your song and load it.
Forgot to save the bassline? You can download my version: Tutorial_Part2.sf2
Adding the second voice
Now it could be nice to have some harmonic support in the second track. To make sure we focus entirely on navigating the tracks and expanding the actual song, we will just continue to use the same sawtooth waveform for all the voices. Only very minor changes to the instruments.
To navigate between the three tracks, just hit Tab to enter the next track or Shift+Tab to enter the previous track. You will still stay in the same order list or sequence mode in the track you arrive at.
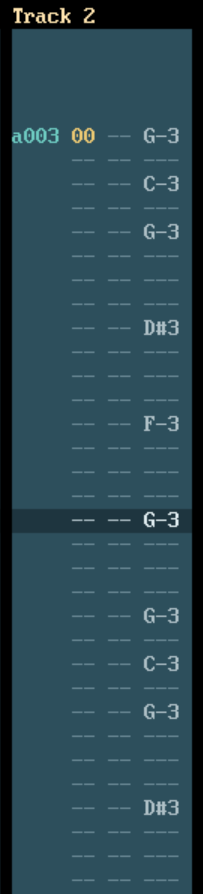
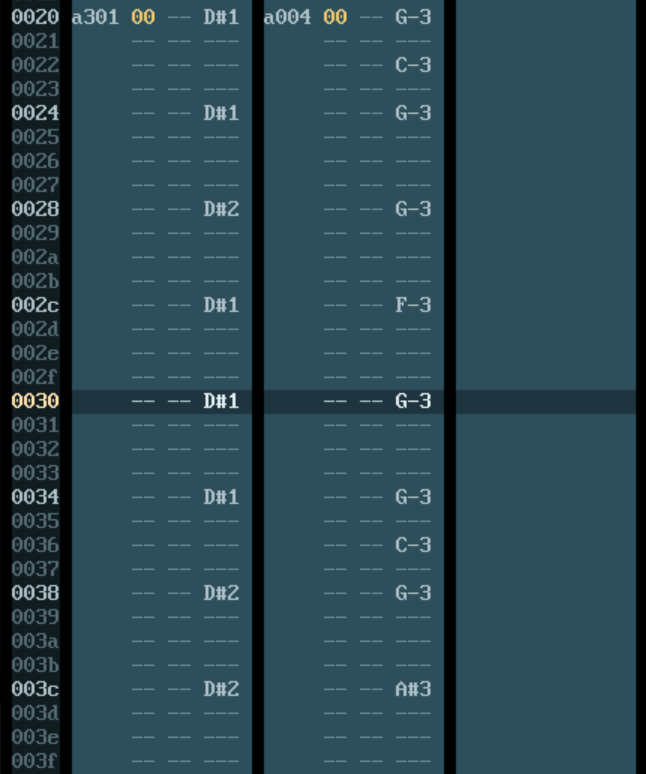
Use Tab now to enter the middle track, and if you’re not in the order list, hit Enter to get there. Because you want to create a new sequence from scratch without cloning anything, Ctrl+f is actually an okay choice here. It inserts the next unused sequence in the order list. I would also delete the a000 below it.
Now enter the sequence, hit F5 to resize it, and enter 020. To make the harmonic support stand out from the bassline, we will choose to make it a couple of octaves higher. Remember how? F3 and F4.
Type in an instrument number and a few notes so it matches this image:
When you play the song now, you’ll notice that the bassline in track 1 plays all four sequences while the single sequence in track 2 just loops around. The three tracks doesn’t have to be aligned in SID Factory II. They can have independent lengths, but typically you would want to them to match each other in the end. So lets try to expand upon track 2 to match the length of the bassline.
Enter the order list of track 2 and cursor down to the loop word. Insert and adapt the order list words until it looks like this:
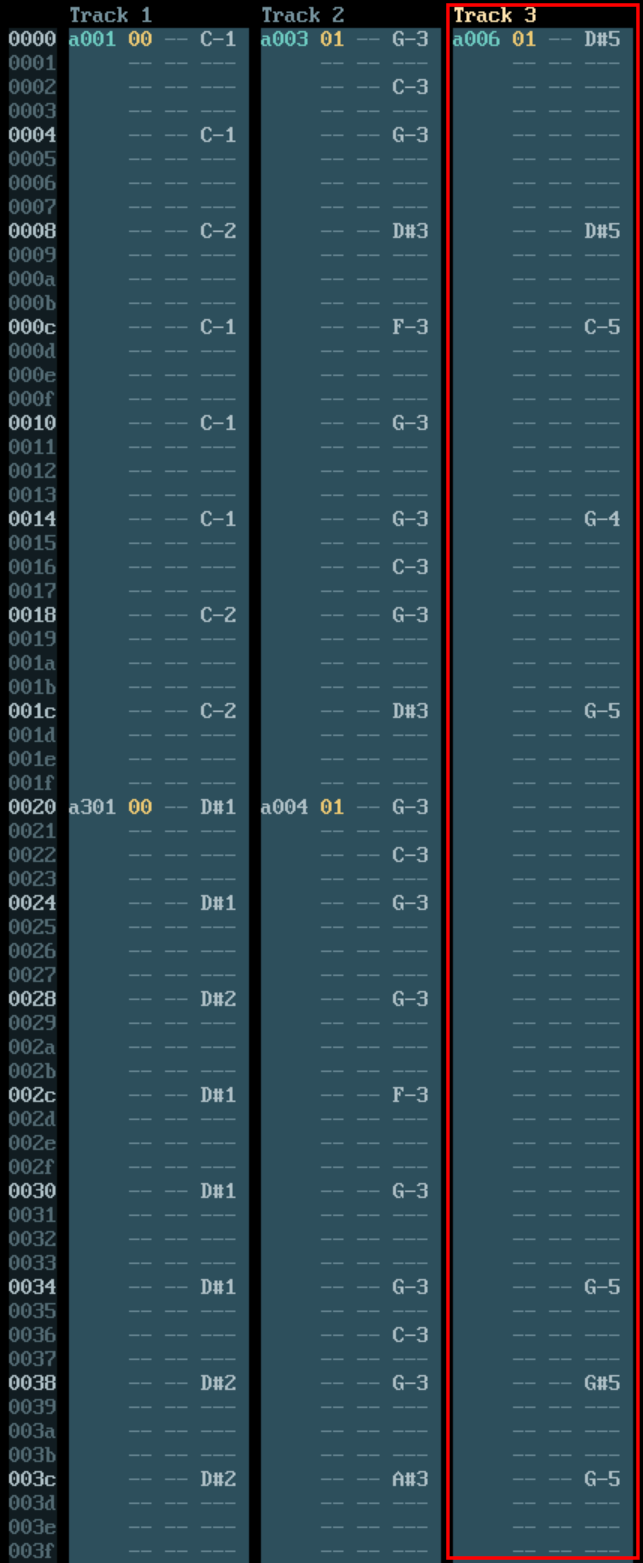
0000: a003
0020: a003
0040: a703
0060: a503
Notice how the last two iterations of the same sequence are transposed. Try to play it now. You can turn follow-play on and off while playing with Ctrl+p.
You’ll probably notice a couple of incongruous notes in the second sequence, and even a few iffy notes in the last one. They should both be amended, so let’s do that now.
The second a003 (at position 0020) is almost okay, but there’s something that clashes a little where D# notes are played in both the bassline and the harmonic part at the same time. The harmonic D# is an octave higher so it’s not a serious issue, but perhaps it would sound even better with different notes at those spots. Changing it is a good exercise, so let’s do it.
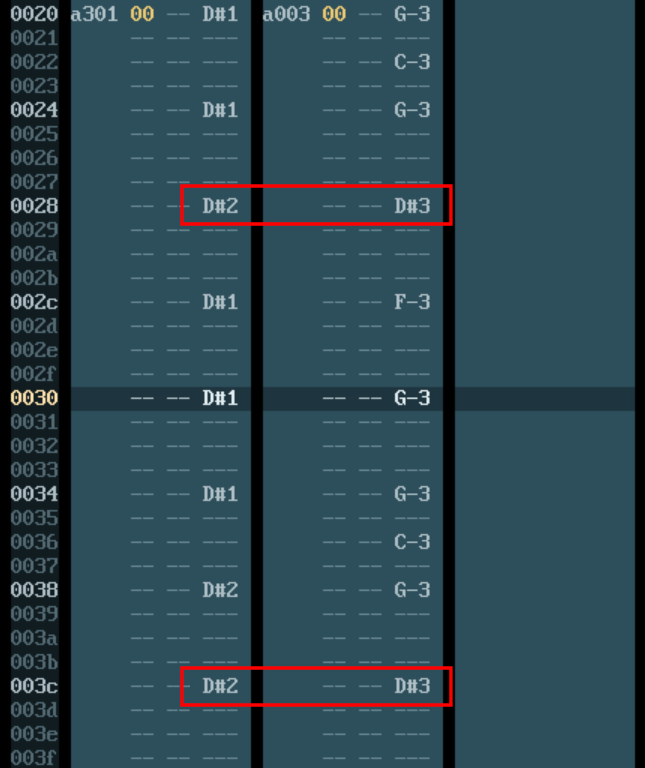
Make sure you’re in the order list, then move to position 0020 where the second a003 sequence resides. Press Ctrl+d to duplicate and replace it. This shows a new a004 that you now know is unique. Editing this won’t disturb the other sequences. Enter it and move down to the two D# notes. Change the first one to G-3 and the next one to A#3. Now a004 should look like this:
You might want to listen to the changes as you make them. Hitting F1 is no longer cool since it always plays from the beginning of the entire song. Instead, you can hit Shift+F2 to play from the beginning of the sequence you’re currently editing. The changes make for a nice variation.
Something fishy is also going on in that last a503 sequence. Transposing the sequence introduced notes that doesn’t sound good either. We should replace those too.
This is a common problem when transposing a sequence, and additional notes spread across the scale may exacerbate the problem. It was also a common rookie mistake when I was learning how to make SID music back in the 80’s. But this is also why it’s such a good thing that SID Factory II actually shows what the notes change into as the sequence is transposed.
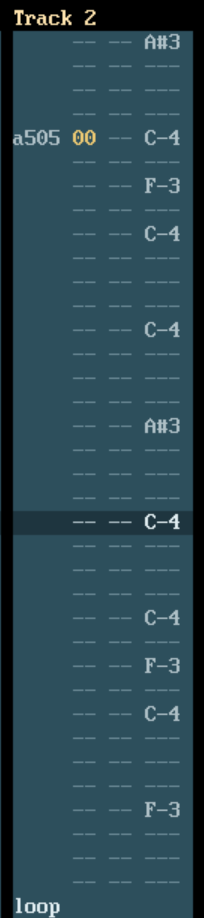
Looking at the sequence now, it’s clear that it’s the G# notes we want to replace:
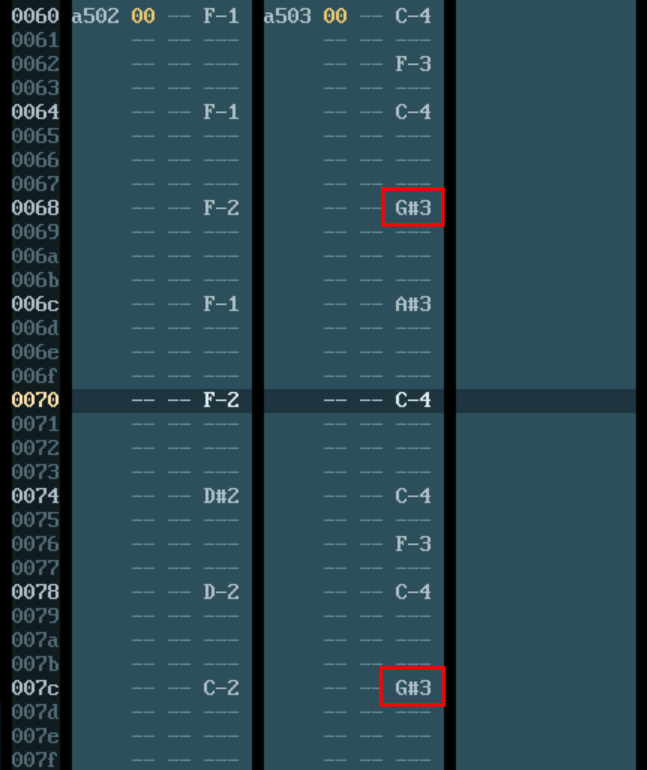
Edit the order list for the sequence now, hit Ctrl+d to duplicate it to a505, then edit it. Change the sequence to look like this instead:
Now play the entire song again. Sounds better now, right? If anything, I think the second voice is probably dominating a bit too much. Maybe it should use a slightly subdued instrument.
Hit Home to go to the top of the tracks and edit the sequence in track 2. Change instrument 00 to 01 instead. Now go down and change all other occurrences you find in the other sequences, so they all use instrument 01. You can use PageDown to move down faster.
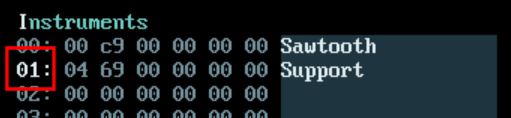
Enter the instrument table – either a couple of Tab hits or Alt+i – and edit position 01 so it reads 04 69 00 00 00 00. Press Enter and name it e.g. Support.
The instrument table should now look like this:
00: 00 c9 00 00 00 00 Sawtooth
01: 04 69 00 00 00 00 Support
Don’t worry about the actual values, we’ll get back to those in a later part. We don’t have to enter the Wave table this time since the new instrument just reuses the same sawtooth waveform.
When you play the song again now, the notes in track 2 sounds much more pleasant. It’s easier to hear the bassline too now. Somehow, it also makes more space for something to happen in track 3.
Adding the third voice
So let’s add an actual melody in the third voice – in other words, a leader.
Tab over to track 3 and edit the order list. You believe that the next unused sequence is 06, so let’s be lazy and just type in a006 instead of a000. That it shows up with just one line in it is a good sign that it truly is unused. Enter the sequence and resize it to 040 with F5. This is twice as long as the other sequences.
Enter the sequence and edit its instrument number and notes until it looks like this:
It’s possible to hear the notes as you’re typing them. Just press the Caps Lock key once to make a listening mode sticky. You can see which instrument is currently selected by the bright color of the position byte in the instrument table. If the instrument you hear is actually not the one typed into the sequence, you can change it on the fly with the plus or minus keys on the numeric keypad.
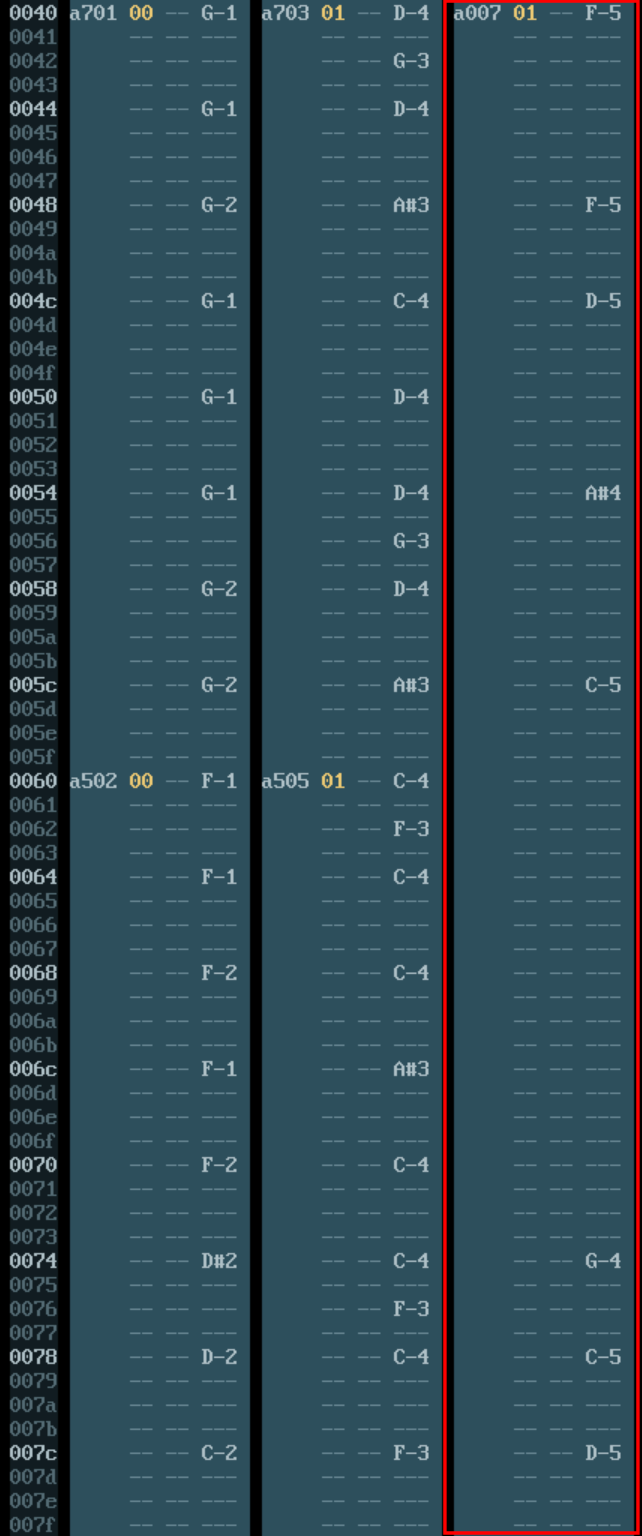
Let’s add a second one with the rest of the melody. Enter the order list in track 3 and go down to the loop word. Hit Insert to repeat the previous sequence. Since we want to change it, we’ll hit Ctrl+d to duplicate it as a007. Now edit that one and change it to look like this:
My version of the song so far: Tutorial_Part3_1.sf2
When you play the song now, you should hear a melody in the third voice. It’s nice and simple, but perhaps too simple. It could be nice if it held its keys down here and there. Let’s see if we can spice it up a bit.
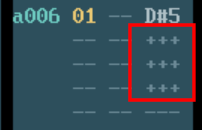
Edit the first a006 sequence. To hold down the key for a note we can add +++ lines to replace the --- lines. In fact, +++ means gate on and --- means gate off. We want to add three +++ lines below the first D#5 (which is at position 0000). This can be done in one of two ways:
- Either hit Shift+Space three times below
D#5, starting at the first---line. - Cursor down to the third
---line (at position0003) and press Ctrl+Shift+Up. This “fills” upwards with+++lines until it meets something that is no longer a---line.
Whenever you want to change +++ back to ---, just press Space in the note column. You can also use Ctrl+Shift+Up again as it works as a toggle. Note that using any of the hotkeys to toggle +++ and --- lines never change the length of the sequence. They only replace – never insert or delete.
Also remember that you can always undo with Ctrl+z.
When to use the first or the second method depends. If you just need one or two +++ below a note, I just use Shift+Space. If there’s a longer distance than that, I use Ctrl+Shift+Up instead. As you might have guessed by now, there’s also a Ctrl+Shift+Down to do the same thing downwards.
These can even be combined to quickly “fill” with all +++ between two notes, even if you’re far part from both of them. Just stay in the same spot and then hit both hotkeys, one after another. It’s all right to fill with +++ all the way down to the next note. The player knows how to quickly gate off then on again to make sure the next note always starts over correctly.
You also can’t “fill” beyond the scope of a sequence. Then the filling just stops.
Let’s add more. Go to position 0021 and press Ctrl+Shift+Up to add five of them up towards the previous G-5 note. In the next sequence (you can cursor freely across sequence boundaries) at position 0043, press it again to add three more. And finally, at position 0060, hit it to add four of them.
Play the song again and you can hear how some of the notes are now held down longer.
While you’re playing the song, try hitting Ctrl+1. This turns off track 1, so you can only hear track 2 and 3 playing. Press it again to toggle track 1 back on. Ctrl+1, Ctrl+2 and Ctrl+3 can toggle all three tracks on and off independently. This is a great aid as you’re editing a song.
Gating on and off at will is useful, but there’s also a related trick called a tie note.
In musical notation it just means that several notes with a curved line between them should be played as one long note. Most music editors for C64 has borrowed this term and then slightly altered it to mean playing different notes without restarting the effects of the instrument. Let’s hear how this works.
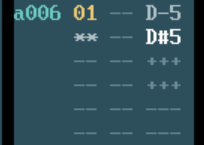
Go to position 0000 in the sequence of track 3 and type D-5 instead of D#5. Just below it (on position 0001) type D#5 instead of the +++ that was already there. Go back up and press Shift+Enter. This shows a ** in the instrument column and also changes the note to use a different color.
This signifies that the D#5 is now a tie note.
Try playing the song and also let it loop around. The beginning now sounds like it’s using a slip note. Tie notes are great for ornamentation such as slip notes, mordents or trills. What’s important to remember is that the effects of the tied note is never restarted. It maintains the same gate on (or repeats it if you gated off before it) and all of the player effects also continue unaffected. When we get to slide and portamento in a later part, tie notes will become even more important.
Let’s add a few more tie notes.
Go down to position 001c where a G-5 is located. Replace it with F#5 and instead put a G-5 just below it. Hit Shift+Enter on the second note to turn it into a tie note. Similarly, at position 0040, change F-5 into E-5 and instead put a F-5 just below it, and again turn it into a tie note.
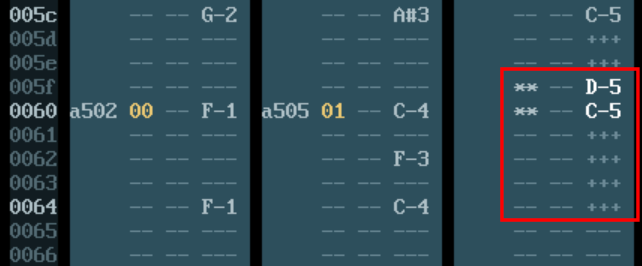
So far we’ve only made slip notes. Let’s try changing a spot into something more akin to a mordent. Go to position 005f, type a D-5 and then a C-5 just below it. Turn both these notes into tie notes. Then cursor down to position 0064 and use Ctrl+Shift+Up to “fill” with +++ lines up to the last C-5 note.
It should now look like this:
When you play the song now, you should hear three slip notes and a mordent – all using tie notes.
 Part 4: The basics of making instruments.