

This is part 4 in a series of tutorial blog posts about how to compose a SID tune in SID Factory II. It will be about making instruments, the ADSR, waveforms, and how the wave table works. Click here for part 1.
In the previous part we created a small tune in three tracks. If you saved that and would like to load it now, start SID Factory II and then press F10 to show a file selector screen. Find your song and load it.
Forgot to save the tune? You can download my version: Tutorial_Part3_2.sf2
It’s time to learn what instruments truly are, what the various bytes actually set up, and how the effects that they control really works. Let’s start with one of the most valuable features of the SID chip.
ADSR
Hit Ctrl+1 and Ctrl+2 to turn track 1 and 2 off now. We only want to hear track 3 for the time being.
All three voices each have something called ADSR that works independently from other voices. It’s one of the features built into the SID chip. ADSR is short for Attack, Decay, Sustain, Release and is sometimes also called an envelope. The four terms are each controlled using a 4-bit nibble, which is 16 steps for each.
ADSR is actually a combination of three durations and one sustained volume level:
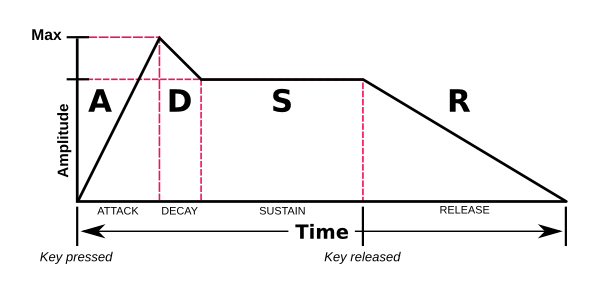
Whenever a note gates on (i.e. triggering a note such as C-5 and as long as +++ lines are following it in the sequence) the following is triggered in the envelope:
- Attack: How long it takes to reach maximum volume.
0is almost instantaneous,Fis very slow. - Decay: How long it takes to descend from maximum to sustain volume. Same rules.
- Sustain: The volume level that the decay should eventually reach.
0is silent andFis very loud.
The sustain level is held for as long as the note it gated on. As soon as it gates off (e.g. when hitting --- lines in the sequence) the following last part of the ADSR is executed:
- Release: How long it takes to descend from sustain volume to silence. Same rules as attack.
Let’s try out some examples to get a better feeling of how it is defined in an instrument and what it actually sounds like. Enter the instrument table (use a few Tab hits or press Alt+i) then go to instrument 01.
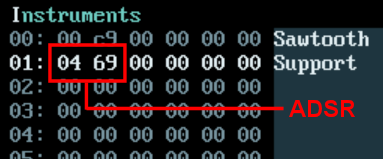
The ADSR is defined in the first two bytes of an instrument. Currently, it reads 04 69. This means an instant attack time of 0, a small decay time of 4 to volume level 6, then a long release time of 9. When you press Shift+q to play the instrument, you can hear a volume bump in the beginning before it reaches volume level 6. Also notice that volume level 6 is held active for as long as you keep pressing Shift+q. As soon as you release it, the tone fades out with a release time of 9.
Change it to 00 a0 instead then press Shift+q or Shift+w on and off.
Now the note starts and stops instantly, and it’s also louder. There’s still an instant attack time of 0, but now there’s also an instant decay time of 0. Because there’s also an instant release time of 0, gating it on and off sounds like it only processes the volume level of a (10) and nothing else.
Change it to 9b 2a and try again.
This really demonstrates the full power of the envelope. The note fades in silently (attack time of 9) then decays even slower (decay time of b) all the way down to a subtle volume level of 2, then when you release the note it fades out slowly (release time of a).
Try experimenting with a few other ADSR settings to get the hang of it. And while you’re at it, try playing the song again to hear how your ADSR settings affect the notes in track 3.
While playing the song and experimenting with long attack and release times, you may notice that the notes never really get started. This is because the SID chip drops everything it’s doing when a note gates off and immediately starts fading it out, regardless of what volume level the attack or decay timers had actually reached at that moment. This can sometimes be used to your advantage in a tune.
Edit it back to 04 69 – or whatever you feel sounds good.
Hard restart
While ADSR is definitely one of the best features of the SID chip, it’s not perfect.
If you were to play a sequence full of smaller note durations, each kept gated on until the next note, you would probably hear the ADSR stumble here and there. Of course this depends on what values you put into the ADSR registers and some values may also alleviate it, but it’s easy to keep running into this problem.
Hard restart was invented to defeat this ADSR bug.
The hard restart prevention works by gating off and resetting the ADSR values a few ticks before the next note triggers. How to design hard restart in a player varies a lot depending on the creator, but in SID Factory II, most drivers that use it triggers the effect exactly two ticks before.
Say you trigger a note and keep it gated on with +++ rows for a few rows, adding up to a total of 15 ticks. The note is first triggered with the ADSR defined in the instrument. After 13 of its 15 ticks have passed, the hard restart takes over. It gates off and applies a different set of ADSR. Depending on this new set of ADSR, it may cut off the remainder of the note, making it sound a tiny bit staccato. However, this also stabilizes the ADSR and makes sure the next note always triggers perfectly. No more stumbling.
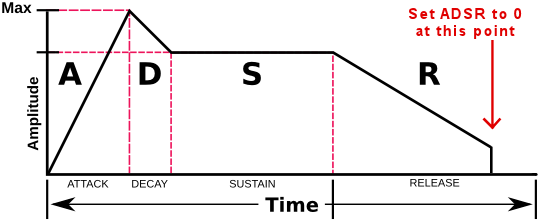
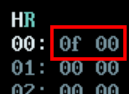
You can enable hard restart for an instrument by setting the most significant bit of the third byte. It other words, add 80 to whatever else is used in this byte.
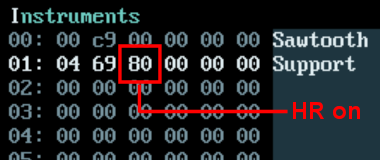
The second nibble points to the HR table. The value pair here defines the ADSR value used for the last two ticks. I recommend you leave that at the default 0F 00. Personally, I have never had to change it.
Waveforms
We have already visited the wave table briefly. It’s where we set a sawtooth waveform for instrument 00 and 01 to use. The table also allows you to change waveform each tick and even transpose. The latter can be relative to the note played or be using a static note value that won’t be altered by the actual note.
But first, what waveforms can be controlled with this table?
The SID chip has four waveforms that can be used by themselves or even combined. Other sound chips of the same era typically locked certain waveforms to specific voices, like noise only being used by the fourth voice. The SID chip doesn’t have this limitation. Each of its three voices can freely choose any waveform at any time, regardless of the waveforms used in the other voices.
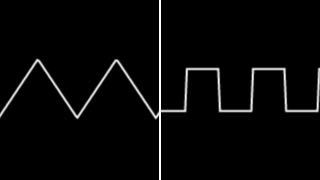
The four basic waveforms are as follows:
 |
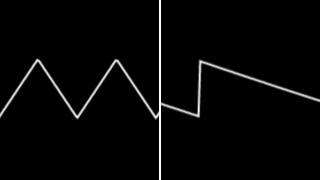
TriangleValue in wave tabel: The closest thing you’ll get to the sine waveform. It’s more subdued than the other waveforms. |
 |
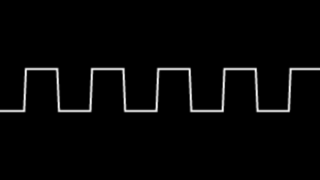
SawtoothValue in wave tabel: This waveform looks like the teeth of a saw. It’s the one we’ve use for our song so far. |
 |
PulseValue in wave tabel: Also know as square wave. It’s the only waveform that can be modulated. Great for leaders. |
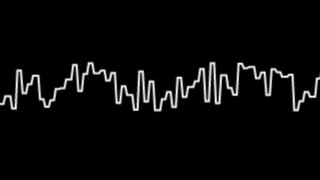 |
NoiseValue in wave tabel: Standard white noise. Useful for creating drums and sound effects. |
It’s also possible to combine some of the waveforms, but the result very much depends on whether you’re using an old or a new SID chip revision.
Yes, during the lifetime of the brown Commodore 64 and the white 64C, there were two major SID chip revisions. The first SID revision was created in 1982 and was named 6581. It had limited ways of combining waveforms. In fact, the chip creator Bob Yannes never intended this to be a feature. In 1986, the 8580 was used in the white 64C. It had a more responsive filter and much improved combining of waveforms.
When you start SID Factory II, it will default to the newer 8580 chip. You can toggle between the old and the new SID chip by clicking the appropriate field in the top bar:

Only the clean waveforms 11, 21 and 41 can be combined. The noise waveform refuses to be combined with anything. In fact, trying to do so locks it up, producing no sound until a specific test bit is set. We will get back to what that means later in this part.
These are the combinations possible:
 |
Triangle + SawtoothValue in wave tabel: Virtually inaudible on an old SID chip. A bit thin on a new SID chip. |
 |
Triangle + PulseValue in wave tabel: The most used combined waveform since it’s clearly audible on both the old and the new SID chip. |
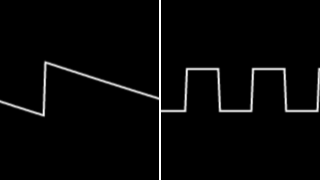 |
Sawtooth + PulseValue in wave tabel: Almost inaudible on an old SID chip. On a new SID chip, it sometimes resembles an organ sound. |
 |
Triangle + Sawtooth + PulseValue in wave tabel: Virtually inaudible on an old SID chip. Even thinner than combination |
Most of the combined waveforms may sound almost identical when using the play buttons here, but when used with notes in a sequence, the difference is often more apparent.
We have already used the sawtooth waveform for the test song we made in the previous parts. Let’s revisit it again. Start the song with F1, go to the wave table now (e.g. Alt+w) and then try editing the first byte (the one reading 21 now). Try the other fixed waveforms 11, 41 and 81. You can also try the combined waveforms. Remember you can toggle voices with Ctrl+1, Ctrl+2 and Ctrl+3 while playing.
While changing the first byte to try out various waveforms and how they affect the song playing, you may have noticed a couple of things. First, the pulse waveform 41 doesn’t say anything at all. Why?
The pulse waveform is special in that it can be modulated. It can be affected by a pulse width value of 12 bits. Because it always defaults at zero at first, the waveform is inaudible. We have to set a pulse width other than zero in order to hear anything.
Learning how to modulate the pulse waveform is advanced enough to warrant a later part of its own, but for now, we’ll just type in the most basic values in the pulse table to set a pulse width for it.
Enter the pulse table with Alt+p and type in these values:
00: 84 00 00
01: 7f 00 00
Now when you try waveform 41 in the wave table and play the song, it should now be audible.
When experimenting with waveform values earlier on, did you try some of the “forbidden” combinations, such as 91 and above? Not surprisingly, none of these produce any sound. But after having used one anyway, returning to the noise waveform 81 is suddenly silent too! What’s going on here?
The problem with noise waveform 81 is that it doesn’t like when you’re using any of those bad waveforms. Trying to combine the noise waveform with something else locks it up. Luckily, there is a way to always unlock it – just set a test bit. This is also known as the oscillator reset.
You set the test bit by adding 10 to the third byte in the instrument. So, if the byte is already reading 80 because of enabling hard restart, you write 80 + 10 = 90. Like this:

If you feel adding hexadecimal numbers together is cumbersome, there’s another way you can set or clear the individual bits of a byte. Just hit Shift+Enter while editing the third byte and you’ll open this box:

Move down to the $10 line and toggle it with the Space button. Hit Enter to accept or Esc to cancel.
When this option is enabled, it sets the test bit very briefly in the beginning of every note. This means that any locked up noise waveform is always unlocked. To test this, try playing the song with e.g. waveform 91 selected in the wave table. As expected, it doesn’t make any sound – and you know it locks up the noise waveform. But as you try waveform 81 again, it still has a sound! Thank you, test bit.
Setting the test bit has no downsides. If you want, you can always leave it enabled.
Wave table
Knowing the waveforms that are possible, it’s time to learn how the wave table actually works. Return to the wave table with e.g. Alt+w. Since we’re going to be testing, toggle the voices with Ctrl+1, Ctrl+2 and Ctrl+3, leaving only track 3 turned on for now.
The wave table has two columns of bytes. The first byte can be any of the following values:
- Waveform – e.g.
11,21, etc. - Loop value – always
7f, which will also change the color of the line.
When the first byte is a loop value, the second byte points to the line it should loop back to. The last byte of the instrument is a pointer to the line in the wave table it should start at. Currently, this is just set to 00:
As the note starts in the sequence, the player will process one line in the wave table for each tick, starting at the wave index. The next tick will read and process the next line. This is repeated until the player hits a line with loop value 7f. The byte next to that then tells the player which line it should go to next.
Usually this is somewhere further up in the same block of lines that the instrument has already processed, but it doesn’t have to. It could be anywhere in the entire wave table.
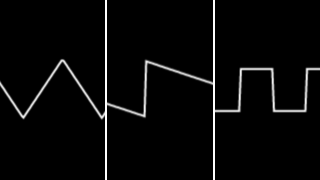
Let’s create a longer example to clarify. Cursor down to the 7f 00 line and hit Insert five times. This creates a total of six lines above the loop value. Now edit it to look like this:
00: 11 00 - Triangle waveform for three ticks
01: 11 00
02: 11 00
03: 21 00 - Sawtooth waveform for three ticks
04: 21 00
05: 21 00
06: 7f 00 - Loop back to the first line
If you test the instrument with Shift+q (or play the song) you’ll hear it toggling between the two waveforms for as long as the instrument plays.
Try hitting Delete on two of the 11 00 lines and two of the 21 00 lines so it only looks like this:
00: 11 00 - Triangle waveform for one tick
01: 21 00 - Sawtooth waveform for one tick
02: 7f 00 - Loop back to the first line
Now the toggling between the two waveforms is much faster. What you’re hearing is actually the duration of one tick – 1/50 of a second on PAL (Europe), or 1/60 of a second on NTSC (USA). But it doesn’t sound nice. It’s too fast. Repeating lines in the wave table can often make instruments sound more pleasant.
Edit (or Ctrl+z) the wave table back to the previous example with seven lines again.
What if you would only want the triangle waveform to play once in the beginning and then only sawtooth the rest of the time? That can be fixed by changing the loop value.
Edit the 7f 00 line to instead read 7f 03.
Now it sounds even more pleasant. However, the wave table now also have redundant lines. It’s looping to the first of three 21 00 lines – but because they all sound the same, you might as well just have one:
00: 11 00 - Triangle waveform for three ticks
01: 11 00
02: 11 00
03: 21 00 - Sawtooth waveform from now on
04: 7f 03 - Loop back to the sawtooth line
The last part you need to know about is the value next to waveforms. So far it’s just been reading 00. This value can be used to offset from the playing note in semitones.
12 semitones is exactly one octave, and its hexadecimal value is 0c. Try modifying the first three lines to use this instead:
00: 11 0c - Triangle waveform (one octave higher) for three ticks
01: 11 0c
02: 11 0c
03: 21 00 - Sawtooth waveform (on the original note) from now on
04: 7f 03 - Loop back to the sawtooth line
Playing the song now, you should hear the small triangle part of the instrument now being played one octave higher. Want to try other values? Knock yourself out for a while.
As you may quickly discover, values that doesn’t add one of more octaves often makes the song more or less disharmonic. Especially if you use different values for each line. You can also try typing 0c on the sawtooth line to transpose the main part of the note.
However, there is one important caveat to this. All effect commands that may modulate the pitch (such as slide, portamento or vibrato) only work as long as the offset value is 00. We’ll get back to effect commands in a later part – but for now, it’s recommended you let the order list decide the actual note transposition, in case you would want the instrument to benefit from such effects later.
00: 21 07 - Sawtooth, 7 semitones added to actual note, one tick
01: 51 0c - Triangle + Pulse combination, one octave added to actual note, two ticks
02: 51 0c
03: 11 0c - Triangle, one octave added to main note - won't be altered by effects =(
04: 7f 03 - Loop back to the triangle line
Having multiple lines with various waveforms and offsets can be extremely powerful when used right. It’s worth it to keep experimenting. Often it’s a good idea to settle with using offsets other than 00 for the lines that are only heard very briefly during the lifetime of a note.
You can use offset 01 and up to the theoretical limit of 7f. However, depending on the octave of the note playing you may run into trouble earlier than that.
The player has access to a frequency table that matches the full eight octaves the SID chip can play. But if you play a note at e.g. octave 6 and add an offset of e.g. 30, you’ll secede from the scope of the frequency table. It’s usually easy to hear when this happens, as the semitone the offset is supposed to be playing suddenly sounds somewhat random. That’s a good sign that you should decrease the offset.
The offset can also use a semitone value read directly from the frequency table, regardless of the note being played. The result will be a wave table line always stuck at the same note, no matter what happens in the sequence. The values for this is 80 to df – which is 00 to 7f with the most significant bit set.
Why would this be useful?
Again, the applications can be almost endless. You could add a static hi-hat in beginning of a changing bass note, or you could create a snare drum where everything is static. Let’s create that snare drum now.
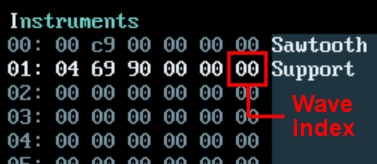
Go to the instrument table and cursor down to line 02. Type in values so it now looks like this:
00: 00 c9 00 00 00 00 Sawtooth
01: 04 69 90 00 00 00 Support
02: 00 c8 80 00 00 05 Snare drum
Make sure the last byte of the snare drum instrument (the wave table index) points to the first unused line in the wave table. If you made a wave table program with a different length than the last wave table example above, the 05 should of course also be different.
00: 21 07
01: 51 0c
02: 51 0c
03: 11 0c
04: 7f 03
05: 00 00 - This is the next free spot in the wave table according to this example
Are you ready for a neat trick? With the cursor sitting on the last byte in the new instrument line, press Ctrl+Enter. This will jump to that position in the wave table, ready to type in values.
Let’s create an oldskool snare drum like in the demo tunes of the 80’s. Assuming that the next wave table spot is 05 like it is for me, type in values so it looks like this:
05: 81 ca - Noise, on a high frequency unaltered by notes
06: 41 a8 - Pulse, on a medium frequency unaltered by notes
07: 41 a4 - Pulse, on a medium frequency unaltered by notes
08: 80 ca - Noise, on a high frequency unaltered by notes, gated off
09: 7f 08
As you can see, all four steps use the static frequencies to ensure they ignore whatever note is playing the instrument. There’s a high pitched noise for one tick, two pulse waveforms for two ticks, and another high pitched noise looped for the remainder of the duration of the note.
Try it out now with Shift+q. Other note hotkeys, like Shift+w and Shift+e and onwards, should produce the same sound – thereby proving that the frequencies are unaffected by note values.
The first pulse tick use a medium frequency, while this is lowered slightly for the second pulse tick. This gives the impression of a downwards slide of the two pulse waveforms, like a “thunk” to the drum. To make things simple, the instrument uses the same pulse setting as was used previously in this part.
You may be wondering about the noise waveform in step 08. Why is this 80 and not 81? The first bit in the byte is actually the gate, i.e. whether the key on the piano is held down or released. By gating the noise off while looping around, the snare drum always goes into the release of the ADSR, fading out the noise, even if you try to hold it with +++ lines in the sequence.
Using static frequencies and gating the end off in the wave table makes the snare drum easier to use in the sequence. You can just tap whatever note, and you don’t have to worry about the snare drum being too noisy if you add +++ lines. In fact, filling with +++ lines between notes saves space!
When the packer reduces the sequence lines to as few bytes as possible, which is done in real time in SID Factory II as you’re editing, it has one byte to represent a note gated on for a specific number of lines. As soon as a --- line is detected, the packer adds another byte to indicate a gate off.
This means that the following:
-- -- C-5 - Note and gate on held for four lines
-- -- +++
-- -- +++
-- -- +++
-- -- D#5 - Note
Takes up less space than this:
-- -- C-5 - Note and gate on held for this line only
-- -- --- - Gate off for three lines
-- -- ---
-- -- ---
-- -- D#5 - Note
The difference is marginal as it only takes up one more byte, but it could add up during a complete song.
The editor and its player won’t prevent you from gating off some of the lines during the lifetime of a wave table program, but it can easily cause more trouble than it’s worth. Using a gate off in the looped part in the end makes sense, but gating off then on across lines can create a wobbling volume that you can’t always trust works flawlessly due to the unpredictable imprecision of the ADSR.
Personally, I usually always keep my wave table lines gated on, at least until the looping part.
That’s it for the wave tables in instruments. There are two more bytes in an instrument that I didn’t mention in this part – one for pulse programs and one for filter programs. These will have their own parts.
Now that we have that snare drum instrument, let’s try adding it to our song.
Go to the top of the first track (hit the Home key to enter the top if necessary) then edit sequence a001. At position 0008, type instrument 02. Now cursor to the note itself on the same line. Hit Ctrl+Shift+Down to fill with +++ lines until the next note. Finally, move down to the line of the next note (i.e. at position 000c) and type instrument 00.
When done, cursor down to position 0018 and repeat the exact same procedure here too.
Sequence a001 should now look like this:
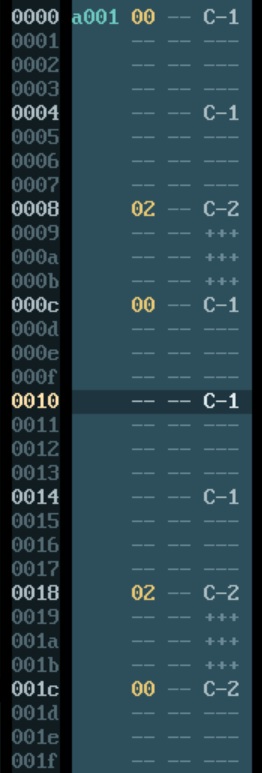
This only added the snare drum to the first of the two sequences used by the bassline. Hit Enter to visit the order list and then cursor down until you hit the last a502 sequence there. Edit it in the same manner as before. Knowing that the snare drum uses static frequencies, you know that it doesn’t matter that the notes read F-2 and D-2 here. The snare drum will still sound the same.
Play the entire song now to enjoy a snare drum inserted into the bassline.
My version of the song so far: Tutorial_Part4.sf2
 Would you like more parts in this series?
AWESOME!
YES! Highly requesting more tutorials for SID Factory II! And thank you so far!
Hej Jens der er nogle ting i din tut som ikke virker for mig fx det med at clone med ctrl + d der er også nogle sange på trods af de er lavet i Sid Factory 2 så kan jeg ikke loade dem ind.
Bruger du den seneste version hentet i toppen af download siden? Og når du prøver på at loade en SF2 sang ind, er det en .sf2 source tune? SF2 kan ikke loade pakkede tunes og .sid filer.
Når du kloner skal markøren stå på selve sekvensnummeret (fx
A001).